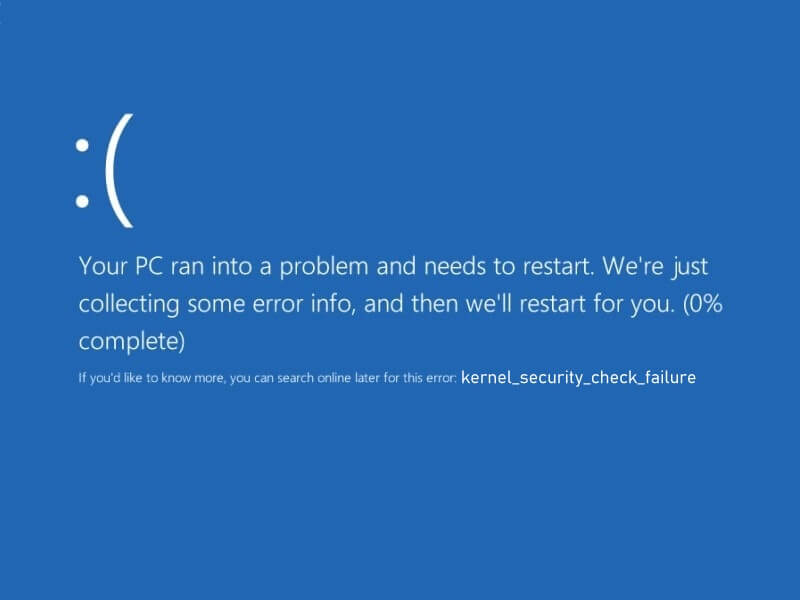
The kernel is basically a small Computer program, that is the core of the operating system. It gets loaded after the bootloader. After that, it handles startup, and input/output request by software. It also handles memory and USB/Peripheral devices. Overall, it controls everything. But, when Kernel detects corruption of critical data structure, then Kernel Security Check Failure error occurs. Usually, KERNEL_SECURITY_CHECK_FAILURE (0x000000139) error occurs due to memory or driver incompatibility issues, or, due to system data corruption.
This error is not so common, and usually, this error shows up right after when every time you turn on the computer. Or, maybe after a couple of minutes of Windows start. And, yes if the error is coming right after boot animation, then you need to boot Windows into safe mode to try out solutions. Though, this error usually users face after a Windows update. The latest Windows update can generate driver incompatibility issues. Well, whatever is the cause, we’re here to help. This article will help you to eliminate this kernel security error in Windows 10.
What are the causes behind this error?
- Outdated, Incompatible, and Corrupted Drivers.
- Recently Added Hardware. (After RAM upgrade)
- While Playing a Game or running specific software.
- Corrupted Windows System Files.
- Third-Party antivirus or security program or due to virus attack.
- Corrupted or Damaged HDD or SSD.
- Faulty Peripheral Devices.
Kernel Security Check Failure Windows 10 Fix
Disconnect all USB and Peripheral Devices
Sometimes problems are too small, we make them complicated. It could be possible, that, due to some faulty device kernel is producing this error.
- First, Shut Down Computer Completly.
- Remove all USB Devices. (If possible remove the keyboard and mouse too.)
- Start Computer Now.
If the problem was with any connected hardware, then the error will get resolved immediately. And, if the error still occurring, then try the next solution.
Remove RAM Stick and Reconnect
Mostly RAM upgrade is the cause behind this error. When you install different frequency RAM in dual channel mode, then Windows show this error. Because the kernel checks all the hardware before Windows starts. Well, you know better, which hardware you have upgraded recently, so remove it. Also, if the error is coming in your PC build, then, assemble the PC again.
Boot Windows in Safe Mode
As I mentioned, if the error is not let you access Windows. And, coming after Windows boot animation. Then, you need to boot Windows 10 in safe mode.
Safe mode is also known as the Diagnostic Mode of Windows OS. It only allows for essential system programs and services. That’s why, this kernel error, will not occur in safe mode. Well, Kernel Security Check Failure Error is related to the Irql_not_less_or_equal Windows 10 error. Both errors occur due to kernel issues. So, you can read my article on IRQL error, to find out ways to boot Windows into safe mode.
There are multiple ways to boot Windows into Safe Mode. If you’re using Windows 7/8, then by pressing F8 just before windows get the load. You can enter into Advanced Boot Options. And, from there, you can choose the Safe Mode option. (Legacy BIOS)
But, if you’re using Windows 10 OS, then, the process to enter into safe mode is different. If you can’t able to open Windows. Then from a recovery drive, you can access Safe mode.
1. If the error is coming after a few minutes of startup. Then, press the Windows + R key simultaneously, type MSConfig, and press enter. In System Configuration Window, Click on the boot tab. Now, mark the Safe mode option and select the minimal radio button.
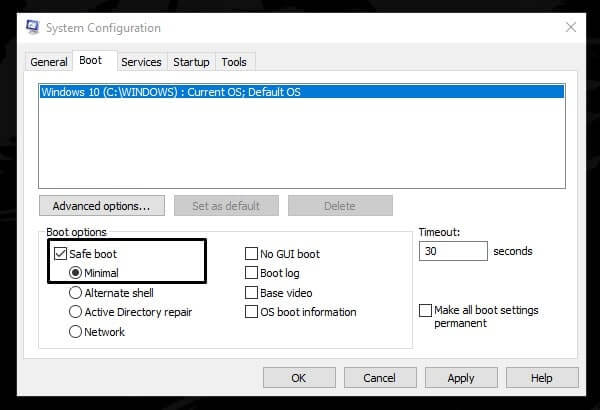
2. After that, click on OK. Then, A popup might appear, click on restart. That’s it. now the system will boot into safe mode. In safe mode, the error will not occur.
Note: To exit from safe mode. You need to follow the same process. And, you need to unmark the safe mode option.
Uninstall Recently Installed Software
Kernel security check failure can occur due to overclocking software. If you’re using software like that to get maximize output from your system hardware. Then, you’re not only damaging hardware but also creating blue screen errors.
Also, if you have installed any third-party antivirus program. Then first uninstall it. Or, if you have made any kinds of changes in the system. Then, undo those changes.
To Uninstall a Windows Program. – Press Windows + R key, type appwiz.cpl, and press enter. Here you can uninstall any program by right-clicking on it. (Or, simply open the control panel and go to the “uninstall a program” option.)
Uninstall Windows Update
If you think that the error is occurring after installing a Windows update.
1. Then, boot Windows into safe mode, and after that go to Control Panel\Programs\Programs and Features.
2. From the left pane, click on “view installed updates”
3. Now, check the “installed on” section to find out the most recent Windows update. If the “update date” is today or yesterday, then you can right-click on it to uninstall.
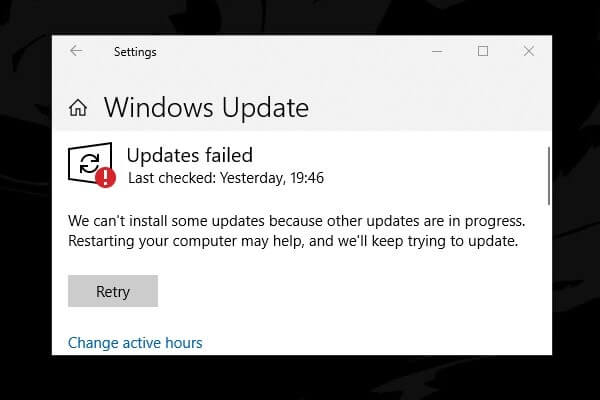
Check Windows Update. (Install Pending Update)
Well, not only the new Windows update can create driver incompatibility issues, but an outdated Windows version also can. It could possible that you’re using an older version of Windows. Which isn’t compatible with the hardware that you’re using. Or, maybe there was a Windows Security Update available, that wasn’t installed properly.
1. To check for Windows Update, Press Windows + I key to open settings App in Windows 10.
2. Click on “Update & Security”. Here you can check for Windows Update.
Update or Uninstall Driver Software
Kernel Security Check Failure Error in Windows 10 is a user made. By that I mean, when the user does install incompatible driver software. Then kernel failed to verify driver files, and a BSOD error occurs. If you have manually installed any driver software, then you can eliminate errors by uninstalling drivers. Or, if there if driver software got outdated, then you can try to update it.
1. You can update driver software using the device manager.
2. To open the device manager in Windows 10, press the Windows + X key. And, from the WinX Menu, click on “Device Manager”.
3. In Device Manager, if any device is showing the yellow mark. This means the driver software isn’t updated on that device. You can update by right click on it. Also, if you know which driver you have installed recently, then you can uninstall the same by right-clicking on it. 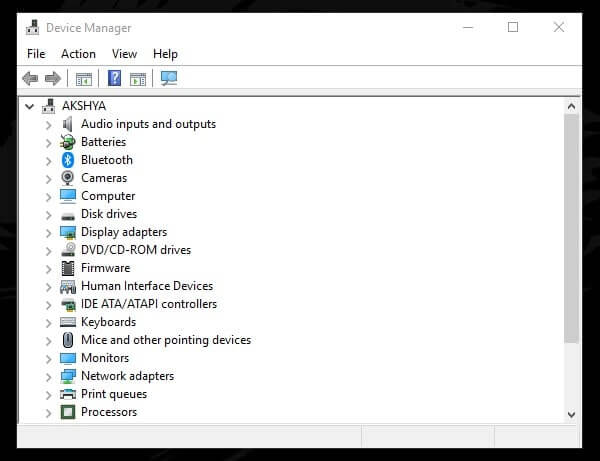 (Though, there isn’t any specific driver to update. So, you need to check manually each device for the update.)
Also, if you’re not able to find out culprit device from the device manager. Then, don’t use third-party driver updater software.
Use Driver Verifier
Driver Verifier is an inbuilt tool by Microsoft. It does monitor kernel mode and graphics drivers. And, detect illegal function and call, that are corrupting the system. This tool also let you to find out unsigned drivers installed by you. This tool has multiple settings, so you have to explore it yourself.
- To open “driver verifier manager”, click on the start button. Search for “verifier” and press enter.
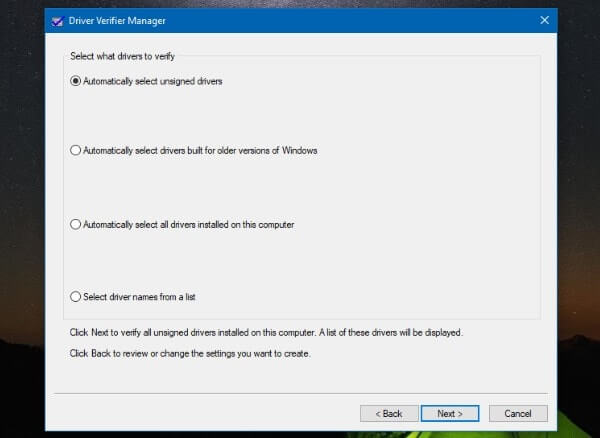
- UAC window will appear to ask for permission. Click on yes and the driver verifier manager window will get open. (Now, Either you can check all drivers for the “kernel_security_check_failure” error. Or, can target a specific driver using custom options.)
- Select “Create Standard Settings” and click on next.
- Choose the “Automatically Select All Driver Installed on the Computer” option.
- Click on “Finish”.
That’s it. Now Computer will restart to test all drivers. You can check more information about the driver verifier from Microsoft documentation.
Perform an SFC Scan
System File Scanner is known as SFC. It does scan all protected system files. And, does replace corrupted system files with a cached copy of Windows files. So, if the Windows 10 kernel_security_check_failure error, is coming due to missing or corrupted system files. Then, it can be easily get fixed after performing the SFC Scan.
1. Press Windows + X key, and then click on “Windows PowerShell(Admin)”. (You can also use Command Prompt (Admin).)
2. Type the following command and press Enter.
sfc /scannow
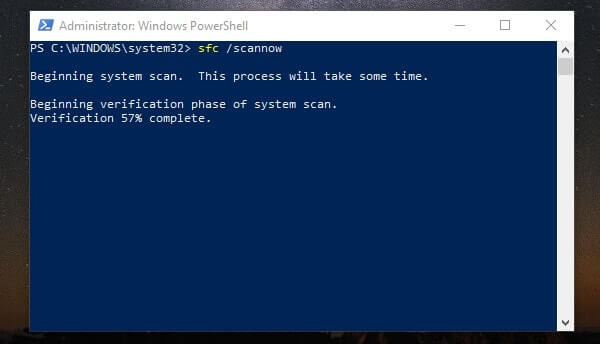
3. The process will take time to get Complete. Do not close the window until the process is running.
Run DISM Scan
Deployment Image Servicing and Management is known as DISM. And, DISM can fix things that SFC Scan can’t. When Windows Services and updates get failed to install and system files get corrupted. Then, Both these scan comes in handy. If SFC Scan wasn’t able to fix the kernel error. Then, the DISM tool maybe can. So, give it to try.
1. Open Command Prompt (Admin) or Windows PowerShell (Admin).
2. After that, give the following command to run the DISM tool. And, press enter.
DISM /Online /Cleanup-Image /RestoreHealth
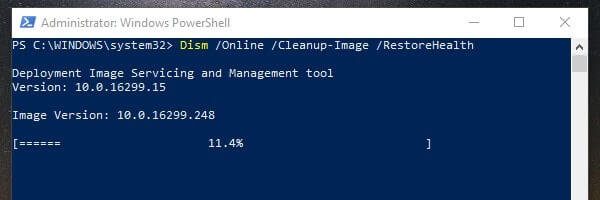
That’s it. wait for the process to get complete.
Use the Memory Diagnostic Tool
Windows Memory Diagnostic Tool is a free RAM testing tool. It’s a basic test, in which the of your Computer will test RAM Stick. So, If the problem is from the hardware part, then, it might get resolved.

1. Click on the start button and search for “Windows Memory Diagnostic”. After that press Enter to open WMD.
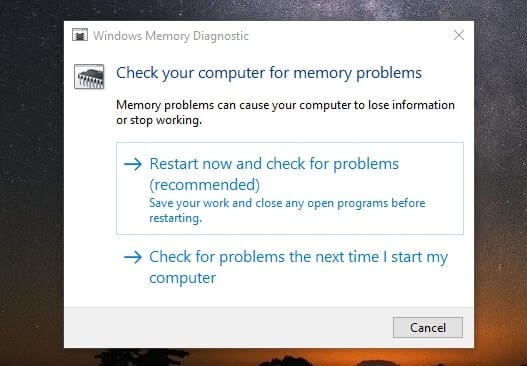
2. A Window will appear now, click on “Restart now and check for problems”.
That’s it. Windows will get restarted. And, the test will be started automatically. This tool contains many extended tests to perform. But none of those tests required for a standard memory test.
Perform a Clean Boot
If you think this error is occurring when you launch a specific software. And, you have already uninstalled it. Then, I suggest you perform a clean boot. The clean boot does start Windows with a minimal set of drivers and programs. It is also a well-known troubleshooting technique. This helps you to find out which normal process is causing the Kernel Security Check Failure Blue Screen error.
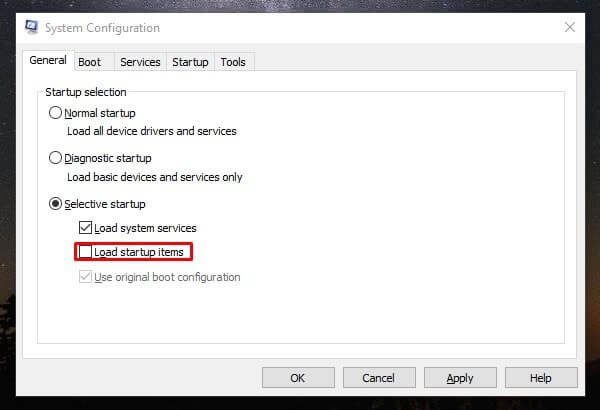
1. First, to open the system configuration Window, Press Windows + R key type “MSConfig” and press enter.
2. Select the “Selective Startup” radio button. Unmark the “Load Startup Items” checkbox.
3. Click on Services Tab, and click on “Hide all Microsoft Services”. After that click on “Disable All”.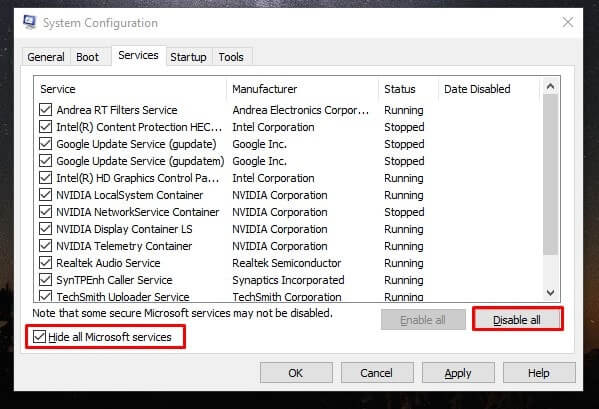
4. Now, go to the startup tab, and click on “Open Task Manager”.
5. Here, you need to disable all enabled startup items. By doing Right Click on each.
6. After that, go to the system configuration window. Click on Apply then OK. That’s it. restart system now, and hopefully the error will get resolved.
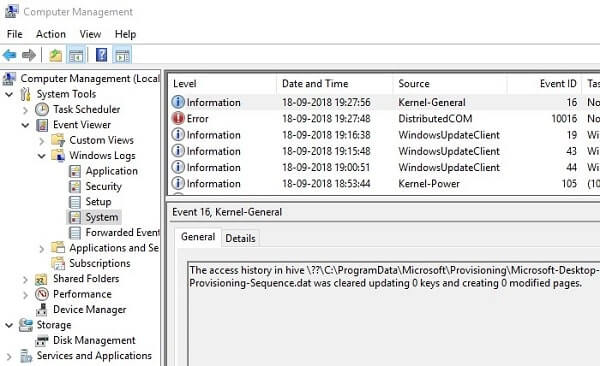
Check Error log using event viewer
Using the event viewer, you can find out, which device and driver are triggering this error. And, after pinpointing the cause, you can fix kernel security check failure error.
1. Click on the start button, and search for “Administrative Tools”. And, press Enter to open it.
2. Open Computer Management.
3. Expand “Event Viewer” and after that expand “Windows Logs”.
4. Click on System. (Here you can see what is causing the error.)
If you’re unable to understand the error caused by the event viewer. Feel free to comment.
Summing – up
So, these are the solutions, which you can try to fix the Kernel Security Check Failure error in Windows 10. First, you need to figure out the issue is with hardware or software. If you haven’t upgraded any hardware then you can try these software-related solutions. And, if nothing works. Then, I suggest you restore Windows if you have already created a backup point. If you haven’t created a backup then you can reset Windows. Only, if you can access Windows. If not, then create a bootable media and reinstall Windows. Don’t forget to create a backup of important data using safe mode.