
Microsoft releases a big Windows update every few months. Although yes you can stop auto-updates in Windows. Recently, however, many users have encountered an unknown problem after updating to Windows 11 latest version. No error code appears, so it is unknown. Just, Windows 11 black screen with a cursor. The black screen disappears after a few minutes for some users. Furthermore, the black screen persists for some users.
If you are experiencing a similar issue after the update. Or, the windows 10 screen goes black randomly. Then, try the solutions listed in this article. Hopefully, the problem will be resolved soon through the next update.
Why does “Windows 11 black screen with Cursor” appears?
A black screen on Windows could be caused by software or hardware issues. After logging in, if the Black screen appears, it’s a software problem. Or, maybe the problem is occurring because of an incomplete Windows update. Also, due to some installed third-party software, this problem can occur.
In order for Windows to boot up, some background processes must be running. However, if any third-party software tries to start when the system starts. Then, Windows shows a black screen.
If Windows Black Screen With Cursor appears randomly or before the login screen. Then, it might be a hardware issue. In most cases, faulty graphics cards could be behind this problem. If apart from Intel’s onboard graphics card your Computer or laptop has a dedicated graphics card. Then, this problem occurs due to outdated driver software.
So, Overall, there isn’t any specific reason behind this Windows 11 black screen problem. Every user’s problem occurs due to different causes. That’s why, In this article, I am adding all possible solutions related to this problem.
Fix Windows 11 Black Screen With Cursor
1. Wait for the installation to get Complete.
With Quality, Definition updates Microsoft also does provide driver updates. It could possible that Windows is installing a graphics driver in the background. So, you have to wait at least 10-15 minutes for to process to get complete. For some users at the top left corner “Installation in process” message also appears. But, it could possible that the driver installation got stuck at some point.
So, even after the half-hour, nothing appears on the screen except the mouse cursor. Then, you have to force shut down your laptop or computer. By holding down the power key for 10 seconds. Also, if you were installing a Graphics Drive update. Then, getting a black screen is quite common. Because the Graphics driver does shut off the screen for a few seconds. So, keep patience.
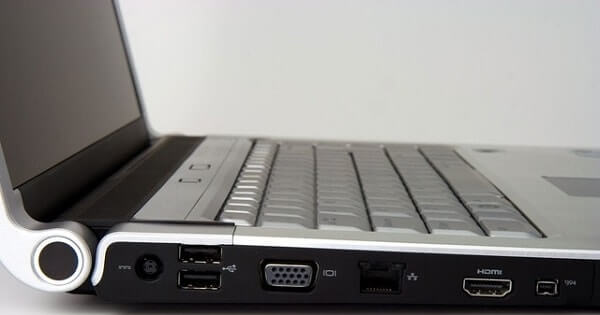
2. Remove all connected peripherals.
It could also be possible that due to some external devices, Windows is showing a black screen. So, First shut down your Computer or Laptop Completely. And, then, remove all non-essential peripherals including the printer, external HDD, secondary monitor, and Ethernet cable.
If you’re using a laptop, I suggest you remove the battery. After a minute of removing the battery. Plug in the laptop battery and then connect the power cable. Now, turn on the laptop or Computer, and, hopefully, the problem will get resolved.
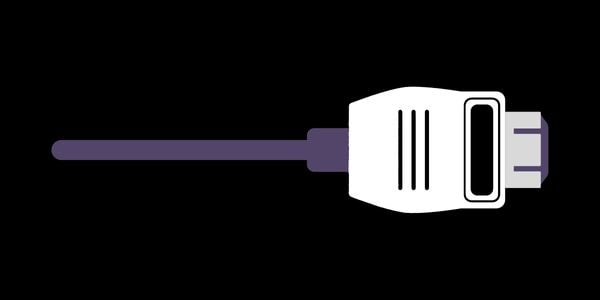
3. Check HDMI Cable.
HDMI (High-Definition Multimedia Interface) Cable is used in desktop Computers to connect a monitor to the CPU. It helps to transfer video signals. So, if a black screen in your Windows PC/Laptop appears randomly. Then, undoubtedly it’s because of the loose connection. Or, maybe HDMI Cable or port got faulty. If you have an older computer with Windows 10 installed. And, instead of HDMI, if you’re using VGA (Video Graphics Array). Then, also this problem can occur.
- First, turn off the Computer. And, remove the power cable from the board
- Unplug all Cables. (Especially HDMI/VGA Cable.)
- Now, reconnect all cables properly. (If there is any cut on HDMI/VGA Cable, then replace it.)
- Turn on Computer. And, if the problem was with the HDMI/VGA cable, then it will get resolved.
4. Wake up the display.
If Windows 11 is unable to detect the display. Then, it will show you a black screen. Though, with a simple key combination, you can wake up your Computer Display.
To wake the display Press Windows + Ctrl + Shift + B simultaneously. Your screen will flash for a second and you will see Windows. Make sure the CPU is turned on.
5. Use a secondary monitor or display.
If the black screen appears randomly. Then, maybe, something is wrong with the display. If you’re using a laptop, then maybe a loose port is the real issue. So, to find out if the problem is with the laptop or computer display or not. You can connect the secondary monitor using VGA Cable or HDMI Cable.
If your laptop doesn’t have a VGA port but your monitor comes with a VGA cable. Then, you can use “HDMI to VGA Adapter”. It cost you less than 5 USD.
After connecting the secondary monitor or display. Do press the Windows + P key simultaneously to open an easy display switcher. Here you will find out four options, which you can select by using the arrow key. I suggest you try them one by one option. Or, you can use the “second screen only” option. It will disable your main screen. And, will project on the secondary monitor.
6. Fix User Shell using Registry Editor.
This is the best solution for those who got Windows 10 black screen with a cursor problem after login. I found this solution on a Windows Forum. And, many users were able to fix this problem with this solution. So, you can give it a try. In this solution, we are making sure that. Windows should open explorer after login. The main reason behind the black screen issue is user shell is corrupted.
1. Press Ctrl + Alt + Delete key simultaneously.
2. A screen will appear with some options, click on “Task Manager”.
3. In Task Manager, Go to File Menu, and click on “Run new task”.
4. Now in the ‘create new task’ window, type Regedit. Then, mark “create this task with administrative privileges” and click OK.

5. In Registry Editor Go to the following directory.
HKEY_LOCAL_MACHINE > Software > Microsoft > Windows NT > Current Version > Click on Winlogon
6. After clicking on Winlogon, you will be able to see certain registries on Right-Side.
7. Double-click on the shell. And then edit the string window, and type “explorer.exe” in the Value data field. And, then click on OK to save changes.
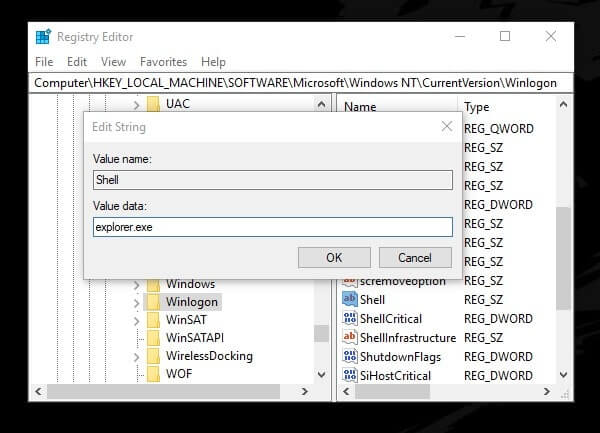
(If in value data already explorer.exe written, then don’t make changes.)
8. Now, close the Registry editor. Again, press the Ctrl + Alt + Delete keys.
9. At the bottom right corner you will be able to see the power icon. Click on it, and then click on ‘restart’ or ‘update and restart’.
That’s it. now hopefully the problem will get resolved after the restart.
Note: Registry editors aren’t for a normal Windows user. If you make some unwanted changes to it. Then, you will end up facing more errors and Windows issues.
7. Go back to the previous version.
If, Windows OS was working fine before. And, Windows 10 Black Screen With Cursor problem occurs after an update. Then, the best solution is to go back to the previous version. This means this option will uninstall all the latest installed updates. And, if the update was the issue, then after going back into the previous version of Windows. Your problem will get resolved.
1. First, force shut down your computer by holding down the power key.
2. After 10 seconds, turn on the computer and don’t log in. Stay on the login screen.
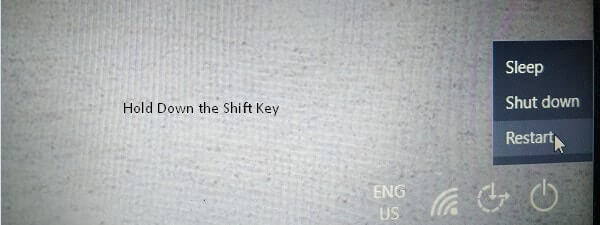
3. In Windows 10 login screen, you will be able to see the power icon in the bottom right corner.
Hold down the shift key. and then click on that power icon. And, then click on restart. (Keep holding down the shift key until the troubleshooting option appears.)
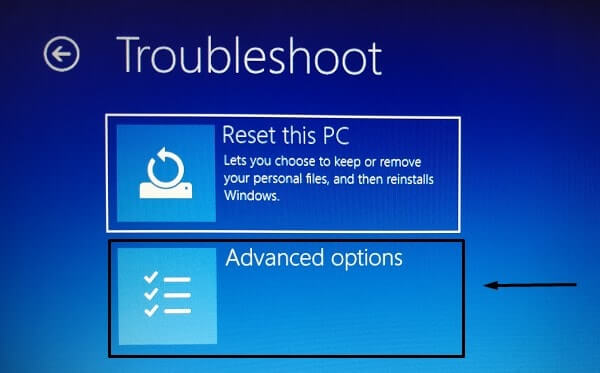
4. A screen will appear, Click on Troubleshoot > Advanced Options.
5. In Advanced options, click on “Go back to the previous version”.
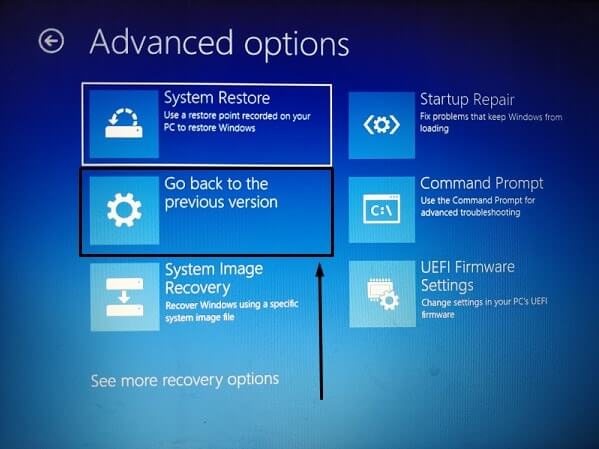
6. Within 30 seconds, Windows will ask you for the account details. To verify the owner. You just have to click on your Windows Admin account and enter a password.
Go back to the previous version, the process takes time. (depends on update size.) So, stay connected with a power adapter, if using the laptop. And, don’t try to force shut down Computers between processes.
When the process will get complete, a normal login window will get open. And, hopefully, this problem will not occur again. Although, Windows does install updates automatically. So, it could possible that Windows install the same update in the background. And, you might face the same problem again. So, you can either stop auto-update in Windows 10. Or, can install the latest version of Windows using bootable media.
8. Run SFC and DISM Scan.
If you haven’t installed any updates recently. But, still, the black screen is appearing randomly. Then, maybe some system files got corrupted. So, I suggest you run a system file checker and Deployment Image Servicing and Management tool. Both tools will help you to replace corrupted system files. With the cache copy of Windows.
1. Press Ctrl + Alt + Delete. Click on Task Manager from the options.
2. Go to file > run the new task, in task manager.
3. In creating a new task window, type CMD and then mark “create this task with administrative privileges”.
4. Command Prompt window will get open.
5. Give the following command and press enter for SFC Scan.
sfc /scannow
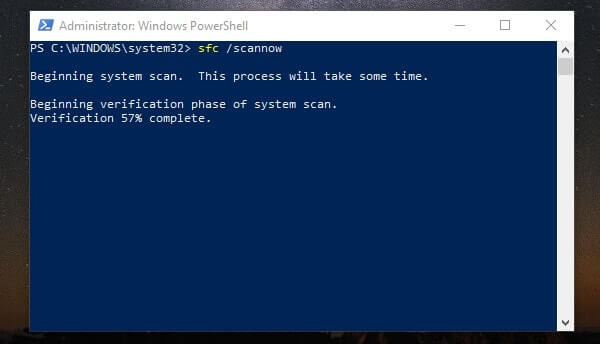
6. After Completing SFC Scan, restart Computer. (By using Ctrl + Alt + Delete menu options.) And, if after Windows 10 black screen with cursor, the problem still not getting solved.
7. Then, open CMD using the same process, and then run the following command for the DISM tool.
DISM /Online /Cleanup-Image /CheckHealth

DISM /Online /Cleanup-Image /RestoreHealth
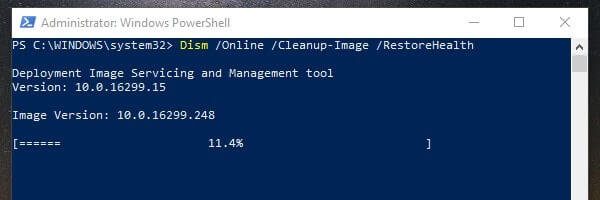

8. Run both these commands one after one. Press enter after giving each command. After completing the DISM scan, restart your computer. And, hopefully, the black screen Windows problem will get resolved.
Start Windows in Safe Mode.
If you’re unable to open task manager. Then, you have to boot Windows into safe mode. Also, to try out the next solutions, a safe mode will be helpful. Safe Mode is basically a diagnose mode of the Computer. Safe mode only allows the essentials Window programs and required services to start up at boot. And, in safe mode, you will not face the black screen issue. So, you can fix this problem from safe mode. You can read my article on Boot Windows 10 in Safe Mode.
1. Enter into Advanced Options, by following the four steps of solution number 7.
2. In the Advanced options, go to Startup Settings > Restart.
3. After Windows restart, you will be able to see a list of options.
4. Select 5, or press F5 to enter into safe mode with the networking option.
9. Turn Off Fast Startup.
Fast Startup in Windows 11, provides a faster boot time when starting a PC. But, sometimes it causes some problems. So, you can try disabling fast startup. But, if the problem doesn’t get resolved. Then, I suggest you turn on fast startup again.
1. In safe mode, open the control panel.
2. Click on hardware and sound > power options.
3. Click on “Choose what the power button does” from the left pane.
4. After that, Click on the “Change settings that are currently unavailable” option.
5. Now, just unmark the “Turn on fast startup” option. Click on “save changes”.
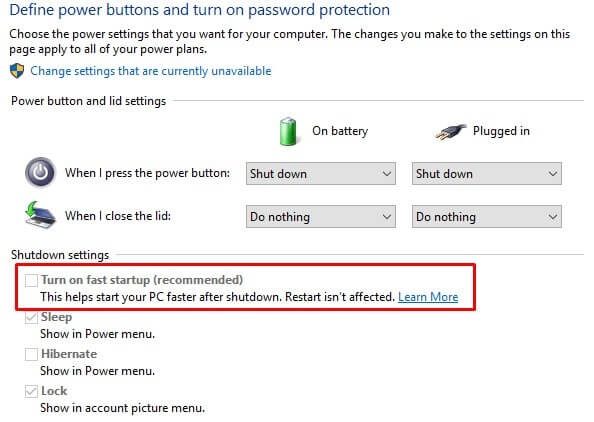
And, shut down your Computer to exit from safe mode.
10. Disable Onboard Graphics Card Driver.
If your computer has two graphics cards. This means an Onboard Intel graphics card and a dedicated graphics card. Then, you can disable the Onboard graphics card driver temporarily.
1. In safe mode, press the Windows + R key. In the run window type devmgmt.msc and press enter.
2. Device manager will get open, expand the “Display adapters” section.
3. Right-Click on your Onboard Graphics Card, and then click on Disable Device.
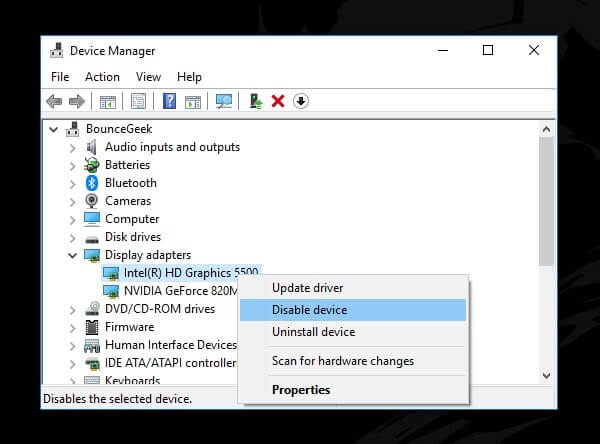
(As you can see there are two graphics cards on my laptop. And, Intel HD Graphics 5500 is Onboard Graphics Card.)
That’s it. Now exit from safe mode. Hopefully, Windows 11 Black Screen With Cursor problem will get resolved. If not then I suggest you re-enable the Onboard graphics card. You can also try to enable or disable a dedicated Graphics card using the same method.
11. Uninstall Problematic Software.
It could possible that, due to some recently installed third-party software. This “Windows 10 black Black Screen with Cursor” problem is occuring. So, I suggest you uninstall all unwanted Windows programs.
1. In safe mode open the run window. (Press Windows + R key.)
2. In the run window, type appwiz.cpl and press enter.
3. Now, from here you can uninstall or change any program.
Summing-up
So, these are the solutions to fix windows 11 boots to the black screen with the cursor. Though, most users have solved this problem with solutions number 6 and 7. If after trying all solution problem doesn’t get solved. Then, create a bootable media of the latest version of Windows. And, perform a clean installation of Windows 11. Although if the update was the reason behind this problem then you don’t need to reinstall Windows. Because These solutions are enough to fix this problem.