Gamers do overclock their CPU, GPU, and even RAM to get more performance. But, most Gamers, don’t think about Monitor overclocking. If you have a good GPU and CPU, but if you’re using a 60 Hz refresh rate monitor. Then, you will be able to achieve 60 FPS only while Gaming. To gain more FPS (Frames per second), you have to buy a higher refresh rate monitor. Or, you can overclock your monitor to a limit. But, if your computer doesn’t have a dedicated graphics card. Then, don’t try to overclock. Because even if you increase the refresh rate. The viewing experience will get worse because of the integrated graphics card only.
What is Refresh Rate?.
The refresh rate of the monitor is, how many times the image on the screen can be refreshed or drawn per second. The refresh rate is always measured in Hertz. If the refresh rate of the monitor is set to too low, then you will be able to notice ‘redrawing’ of the image. In technical terms, we call it screen flickering. Monitor Flickering causes eye strain and headaches. So, high refresh monitors not only increase your gaming experience. But also, you will not face the eye strain problem.
Is it safe to overclock Monitor?.
Pushing hardware far from its limit can damage the hardware, or can decrease its lifespan of it. Though, some monitor comes with overclocking feature. This means some manufacturer lets the user increase the refresh rate until a certain point. I am using an LG 22inch 22MP68VQ monitor. And, it comes with an option to increase the refresh rate up to 75 Hz from 60 Hz. Though, If your manufacturer doesn’t allow you to increase the refresh rate. Still, you can try to increase it, it will not harm the monitor. The refresh rate of the 60 Hz monitor can increase up to 75-80 Hz. But, if you try more than that, it can definitely harm your monitor. So, try at your own risk.
Overclock Monitor to a Higher Refresh Rate on Windows 11/10
Note: Before overclocking the Monitor please make sure the HDMI cable is connected to the graphics card HDMI port. If you’re using DVI-D/VGA Cable, then you will not able to increase the refresh rate.
Overclock LG Monitor on Windows 11/10
As I mentioned above, I have an LG Monitor. And, it comes with an option to increase the refresh rate. So, If you also own an LG Monitor, then, follow these steps. But, If you have any other manufacturer monitor, try the next solution then.
1. First download “On Screen Control” from their official site.
2. Install it on your Windows PC, and then launch it.
Click on the “Game mode settings” option.
3. From the drop-down menu, set the response time to “Faster”.
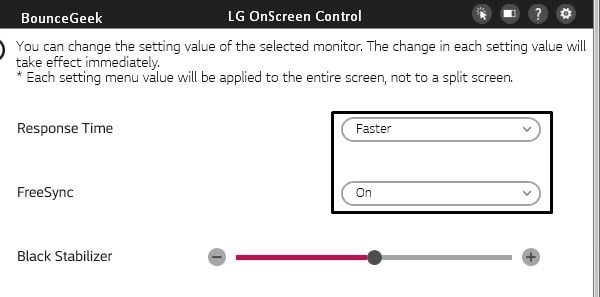
Also, if your monitor does support FreeSync then turn it on. That’s it. You have unlocked a higher refresh rate. Now, you have to set it.
Change monitor refresh rate (Windows Built-in Option)
1. Right-Click on the desktop, and then click on “Display Settings”.
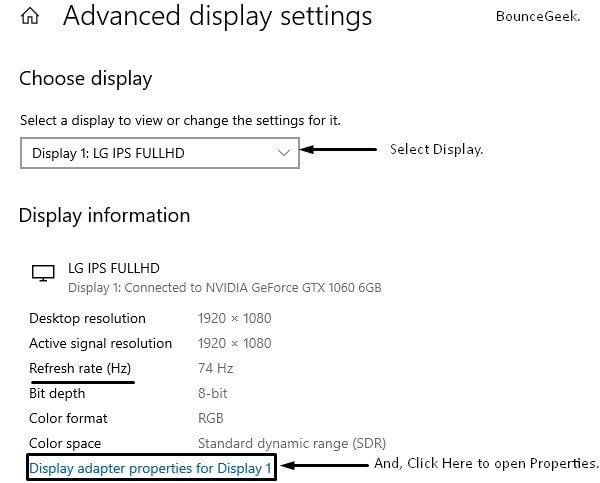
2. Scroll down a little, and, click on “Advanced display settings”.
Note: If you’re using Windows 11, then you will get the option to “choose a refresh rate” on the Advanced display page.
Here, you will be able to see your current Refresh rate.
3. After that, click on “Display adapter properties for Display 1”. (If using multiple displays, then, select the right one from above.)
If in choose a display your monitor name doesn’t appear. Then, you have to fix Generic PnP Monitor issue first.
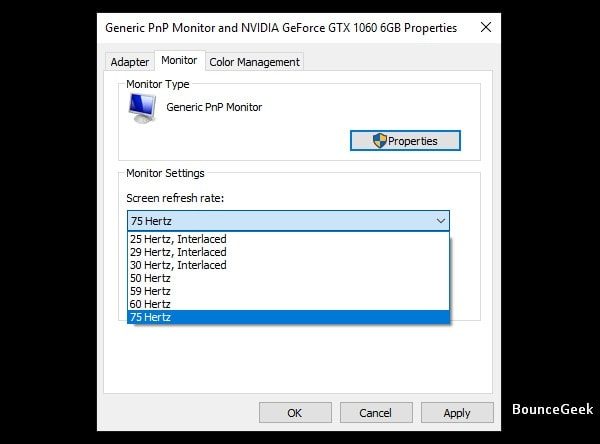
4. In the Display Properties Window, click on Monitor.
And, here you can select a higher refresh rate. As you can see, I can select 75 Hertz. Previously, the refresh rate of my monitor was 60 Hertz.
Overclock Monitor using NVIDIA Control Panel
Set resolution lower & increase Refresh rate
A lot of normal 60Hz monitors can get up to 75 Hz. By selecting monitor resolution to lower. If your monitor resolution is 1920×1080. Then set it to 1280×1024 or lower. And, automatically, a high refresh rate will get unlocked. Personally, I have tried this method on NVIDIA GPU. If you can play in lower resolution, then this method is for you. This is the safest method, and it doesn’t include the overclock monitor. For overclocking monitors, check out the next two methods.
First, make sure you have installed NVIDIA drivers correctly.
1. Right-Click on the desktop and then click on “NVIDIA Control Panel”.
Note: Is NVIDIA Control Panel not showing in the menu?. Then, read my article on “NVIDIA Control Panel Missing“.
2. In NCP, Click on “Change Resolution”.
3. Select the display if you’re using two displays.
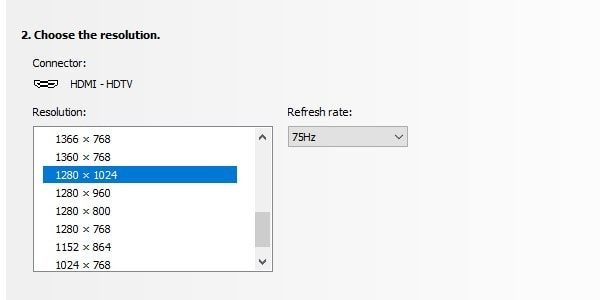
4. Now, in the “Choose the resolution” section, select a lower resolution. And, keep checking the refresh rate.
When the Refresh rate drop-down menu shows 75 Hertz. Select that resolution and then save it with a higher refresh rate.
Overclock Monitor Refresh Rate using the NVIDIA Control Panel
Warning: This and the next method can damage your monitor. If you set the refresh rate much higher.
In this method, we are not setting resolution lower, just gonna increase the refresh rate. To keep your monitor safe, try increasing the refresh rate at the 1-5 gap. Don’t try to jump from 60 Hertz to 120 Hertz.
1. Again open NVIDIA Control Panel, and, click on Customize.
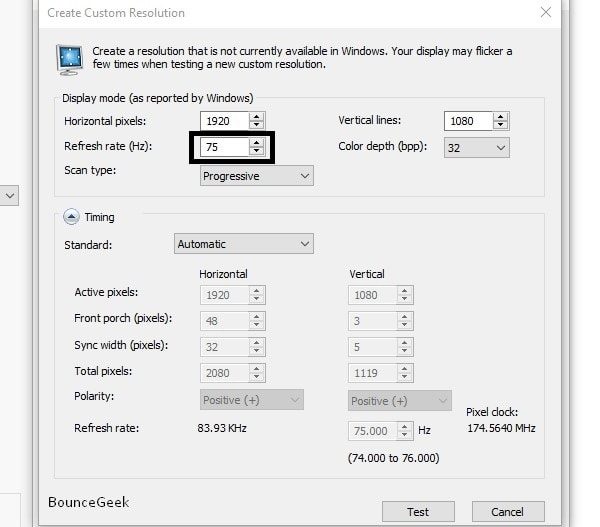
2. Mark the “Enable resolution not exposed by the display” option. And, then click on ‘Create Custom Resolution’.
3. Here, you can set a custom refresh rate. Increase refresh rate 1 at a time and then click on OK.
If it works then the screen will flash and you will be able to see the desktop. And, if it doesn’t work then your monitor will go black for 20 seconds. Then, it will revert the changes.
Intel HD Graphics Control Panel
Most of the laptops come with Intel integrated graphics cards. And, with Intel’s own Graphics Control Panel, you can easily change resolution and refresh rate.
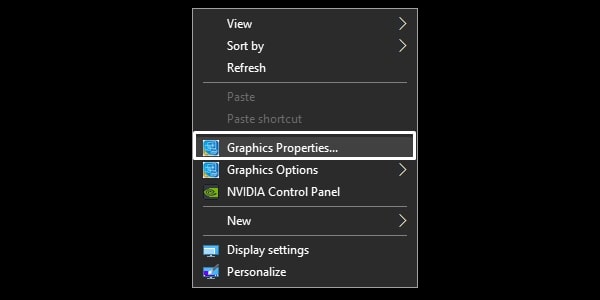
1. Right-Click on Windows and then click on Graphics Properties.
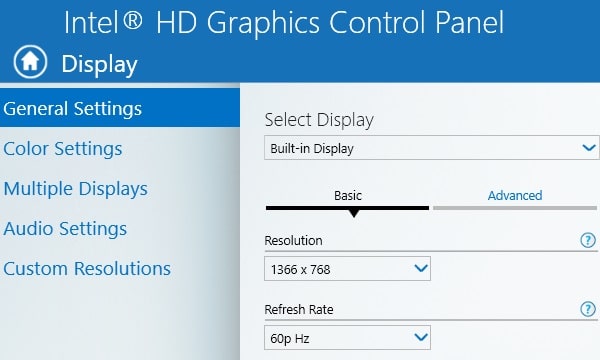
2. Intel HD Graphics Control Panel will get open, click on Display.
3. After that, select the display that you want to overclock. In my case, I am selecting “Built-in Display”.
From General Settings, you can manage resolution and Refresh rate which is available to customize by default.

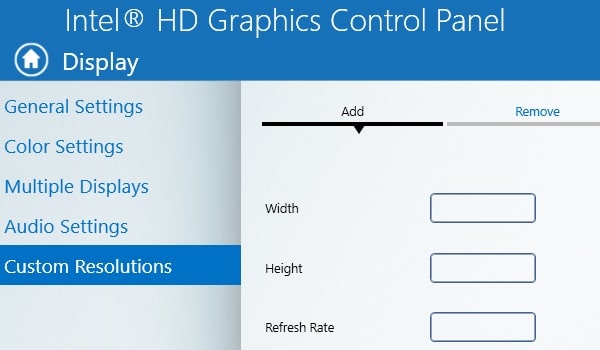
4. Though, if you want to overclock to a higher refresh rate then click on custom resolutions.
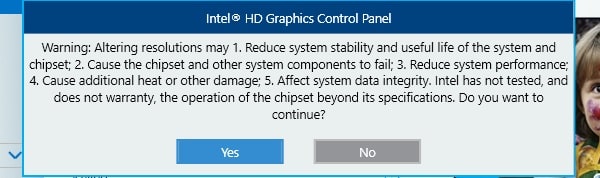
You’ll get a warning message, read that carefully. Click on Yes.
Now enter your width height and refresh rate. And, click on add.
If your display can’t go to the set resolution and refresh rate by you, then, you will have to quit or try again. If you get your desired settings, then you might have to reboot the system. Personally, I don’t suggest overclocking a laptop screen, because the laptop screen is designed to work at a specific refresh rate. Still, you can try at your own risk. Though changing general settings from Graphics Control Panel is not risky.
For AMD GPU Users
If you’re using AMD Ryzen GPU then just like Intel HD Graphics Control Panel, you can change resolution and refresh rate.
1. Right-Click on anywhere on the desktop and then click on AMD Radeon Settings.
2. From the bottom, click on “Display”
3. Next, click on Custom Resolutions and then click on Create.
Now, change the refresh rate to the desired level and save settings.
Overclock Monitor Refresh Rate using CRU
This method will work for all AMD/ATI or NVIDIA GPU. Custom Resolution Utility (CRU) is an open-source free tool to set custom refresh rates and resolutions. This tool can also harm your monitor if used incorrectly.
How to Overclock Monitor Refresh Rate
1. Download Custom Resolution Utility (CRU) from its official site of it.
2. Extract the Zip File of CRU and then run the CRU application file from it.

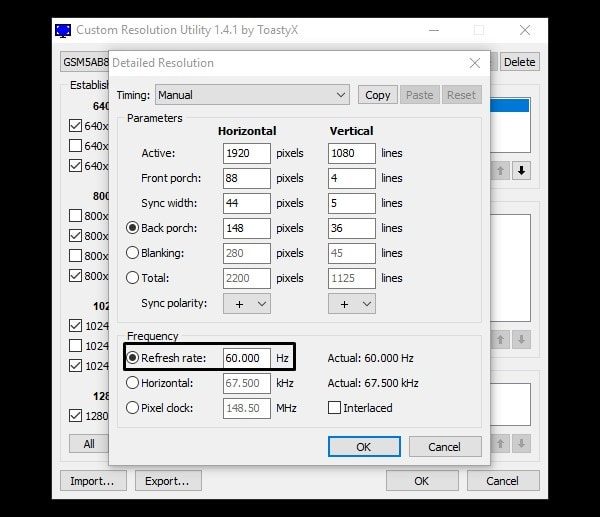
3. Software Window will get open, no need to install.
In the detailed resolution, it will show you your current resolution and refresh rate. To add a new refresh rate with the resolution, click on the “Add” option.
4. In the frequency section, now you can experiment with the refresh rate. Increase refresh rate and then click on OK. (Try increasing the refresh rate slowly.)
After you’re done increasing the refresh rate, you have to run the restart file from the CRU folder. This application will restart your graphics driver. If using a 64-bit OS, then run the restart64 file. After setting up the custom refresh rate using the CRU program. Follow the second part of the first method and change the refresh rate. And, if anything goes wrong, run the “reset all” file from the same folder.
Setting up a higher refresh rate can lead to the Frame Skipping problem. So, search for “Frame Skipping Checker” and test your display. Also, If you want to check how many FPS you’re getting. Then, check my article on “Best FPS Counter Software“. That’s it, these were the method to overclock monitor. If you know any other better method, feel free to comment.