Every year, Apple releases a new Mac operating system. And, this year, Apple is going to release macOS Big Sur. Yes, the “Big Sur” name sounds silly. But, If you’re unaware, Big Sur is a rugged and mountainous section of the Central Coast of California. Instead of macOS 10.16, Apple is gonna release it as macOS 11. Finally, after nearly 20 years, Apple has transitioned from macOS 10 (aka macOS X) to macOS 11, which is a huge change.
The new Mac OS Big Sur Beta has many new features that include an iOS inspired design. New Control Center, which is visually similar to the Control Center on iOS. But with controls adapted for the Mac. Apple also made changes in Safari and added greater privacy controls. Also, a new translation software that uses on-device processing. Overall, there are many big changes you will see in macOS 11.
The final version of macOS 11 Big Sur beta is going to arrive in the fall/autumn. Though, till then you can try the public beta of it. But, for that, you have to sign up for Apple Beta Software Program. Well, now it’s not worth signing up, because, the final version is soon to arrive. So, the best option left to try macOS Big Sur Beta is by installing it in VMWare or Virtualbox. And, this article is about, how to Install macOS Big Sur Beta on VMware on Windows PC.
Important: This article is dedicated to Windows users, who want to install and try macOS in their system. If you’re MacBook, iMac, iMac Pro, Mac Mini user, then wait for the official update. Big Sur runs on the following Macs.
- MacBook: Early 2015 or newer
- MacBook Air: Mid 2013 or newer
- MacBook Pro: Late 2013 or newer
- Mac Mini: Late 2014 or newer
- iMac: Mid 2014 or newer
- iMac Pro: 2017 and later (all models)
- Mac Pro: Late 2013 or newer
Install macOS Big Sur on VMware on Windows
Download Required Files.
To Install macOS Big Sure on VMware, you need four Files. You can also install macOS 10.15 Cataline on VMware.
- VMware Player.
- macOS Unlocker V3 for VMware. (Click on Assets and download the latest version.)
- macOS Big Sur Beta ISO. (Uploading, the link will be available soon.)
- VMware Tools (Optional).
VMware Player or VMware Workstation Player is a virtualization software package for x64 based computers, that runs on Windows or Linux. It is available for free, for non-commercial use. With VMware, you can run any version of Windows, Linux, and macOS as the guest operating systems. So, no more need to dual-boot your current operating system to try out any other OS. With this software, you can also run any third-party OS (Android OS), you just need an ISO file of it.
The VMware tool lets you create a virtual machine, that uses the physical resources of your system. So yes, you need a high-end PC to run any OS Virtually. You can check the minimum requirement to run any OS on the VMware site. Though, here is the screenshot of my PC specification, so you will get a fair idea.
macOS Unlocker Tool – By default, VMware keeps the macOS option disable. So, to enable Apple’s guest operating system in VMware, you need to run the macOS unlocker tool. Without it, you can’t install any mac operating system in Linux or Windows.
macOS Big Sur ISO File – It might be possible that by the time you’re reading this article. macOS 11 stable version gets released. If that so, then no worries, the whole installation process will remain the same. To demonstrate the installation process, I am trying public beta 4 of macOS Big Sur. Though, I will update the new macOS 11 Big Sur ISO file link, whenever it gets available.
VMware Tools – VMware tool is useful to fix macOS 11 resolution on VMware. And, it will make the OS more responsive. Though, it is optional to install. Without it also, you can try new macOS.
macOS 11 Big Sur VMware Installation Process.
Install VMware and macOS Unlocker.
1. Download the latest version of the VMware workstation player and perform the installation on your Windows PC.
2. Don’t forget to select the “enhanced keyboard driver” option during the installation process. And, at the end of the installation select “Use VMware workstation 15 players for free for non-commercial use”.
Once, the installation process gets complete, close VMware Player completly. (With the task manager, you can make sure that not any background process of it running.)
3. Now, Extract the unlocker tool file using 7Zip or any file extraction software. And, do run the “win-install” file as administrator.
A CMD window will get open and the unlocker tool will get run. The unlocker tool will download a package, so make sure the Internet is active & connected.
Create a new Virtual Machine.
1. Open VMware Player, and click on “Create a new Virtual Machine”.
New Virtual Machine Creation Wizard will get open, select “I will install the operating system later” option. Click Next.
2. Select Apple Mac OS X. And, from the version drop-down menu, select macOS 10.16, yes, VMware not updated it yet, with version 11. But, it will not impact on the installation process. Click Next.
3. Now, In virtual machine name type “macOS Big Sur Beta”. You can enter anything. You can also change the location of virtual machine files, but I prefer not to change. Though, we will need this location later to edit a VMX file. So, keep remembering, whatever you change.
4. Next, select the “Store virtual disk as a single file” option and specify the disk size 120 GB. The disk size should be more than 50GB. So, you can keep it 50 GB if you want.
Click Next, and click on the “customize hardware” option.
5. The hardware window will get open. So, here we are specifying the hardware resources that macOS Big Sur virtual machine can use. In my PC, I have installed 16 GB RAM sticks. So, in “memory of the virtual machine”, I am giving 8 GB.
Next click on Processors, and select 4 cores in numbers of processors. (I am using 6 core intel processor. Higher Core means better performance.)
6. Select New CD/DVD (SATA) option from the left menu. And, click on “use ISO Image File”. Click on browse and select the macOS Big Sur ISO file that you have downloaded before.
7. After setting up all hardware settings, click on close to save all changes. After that, click on Finish.
macOS Big Sur Beta virtual machine will get created. But, before running it, you have to edit a File.
Edit macOS Big Sur VMX File.
1. Go to Documents > Virtual Machine > Open macOS Big Sur Folder.
2. Right-Click on the macOS Big Sur Beta.vmx file and open it with Notepad. (You can use any third-party text editor. There are many text editor for Windows available.)
3. Scroll down to the bottom of the text of the VMX File in Notepad. And, add the following code.
smbios.reflectHost = “TRUE”
hw.model = “MacBookPro14,3”
board-id = “Mac-551B86E5744E2388”
smc.version = “0”
After adding this code, click file > save.
That’s it, Virtual machine is ready now. Now, we will Install macOS Big Sur on VMware.
Run macOS Big Sur Virtual Machine.
1. Do open VMWare Player, and click on “Play Virtual Machine”.
2. You will now see an Apple logo with a loading bar. Wait for the machine to boot up.
3. Select your preferred language and click on the –> next arrow.
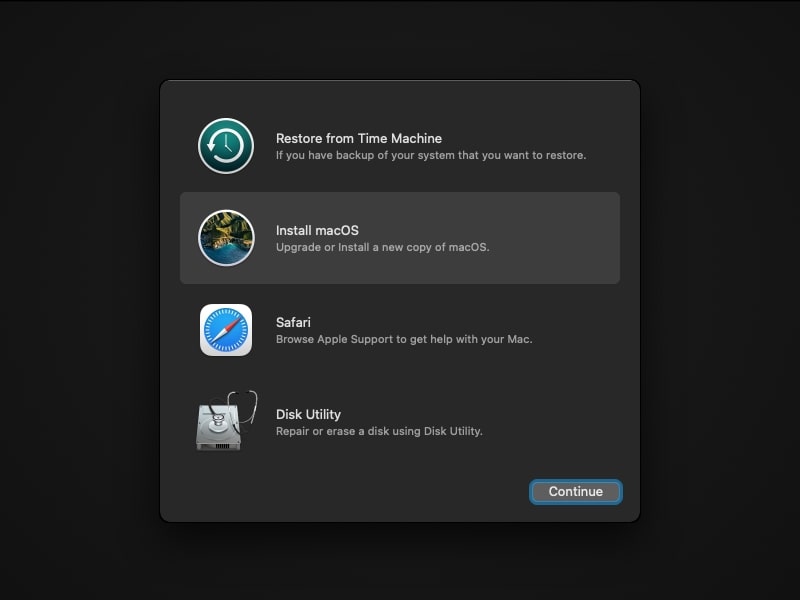
On the next window, select “Disk Utility” and click on continue.
4. From the left bar of the Disk Utility window, select “VMware Virtual SATA Hard Drive Media” And, click on Erase from the upper bar.
5. Enter macOS Big Sur in name and click on Erase.
Once, erase process gets completed click on done to close the dialog box.
6. Now, from the disk utility tab, click on “Quit Disk Utility”.
Select “Install macOS” and click on Continue.
On the next screen, click on Continue. Now, you have to agree on the software license agreement, click on Agree. (two times.)
7. On the next screen select the macOS disk that you have created and click on Install.
During the installation process, macOS big sure virtual machine will get restart 2/3 times to complete the installation process. So you just sit back and relax. The process will take roughly 30 minutes based on assigned hardware to the virtual machine, so to be patient.
Basic macOS Account Settings After Installation.
Once the installation process gets completed, you will have to go through some basic setup process. Which is simple, so you can do it yourself. Though still, I am adding if you get stuck somewhere.
Select Country, Click Continue. Choose a Keyboard layout and then click on Continue.
Click on Not now, for accessibility. Next, click on continue from Data & Privacy Window.
On Migration Assistant, Click on not now.
Now, this is important, don’t sign in with your Apple ID, click on Set up later > Skip.
Next agree on T&C and after that create a computer account by entering your details.
Express setup window will appear, to fast forward setup click on continue. Also, click on continue for Analytics.
Next, click on “Setup later” for screen time. (At this moment by setup got crashed, but got open again with the lock screen window. So no worries, if the same happens with you also.)
That’s it, select the theme, and continue.
Finally, wait a little while for macOS Big Sur to finish the setup. After a while, macOS will get open. So, this is the method to Install macOS Big Sur on VMware on Windows PC.