We all know, how good the Apple Ecosystem is. It lets you sync calls and messages across apple devices. And, to make Apple Ecosystem stronger last year Apple announced Universal Control Feature. It allows you to magically control your iPad from Mac Keyboard and Mouse. You can move your mouse pointer across your Mac and iPad. And, it’s not limited to two devices, you can control three Apple devices through one keyboard and mouse. Moreover, with Universal Control you can use the iPad as Second Monitor for MacBook or Mac alone. Yes, you can also Mirror or Extend your Mac Screen to an iPad.
To use the Universal Control feature no app installation is required. Because it’s a built-in feature that comes with the latest macOS and iPad OS. But yes, there are a few things that you have to enable to use Universal Control.
Here’s how to set up Universal Control between Mac and iPad. So that, you can control the iPad through Mac or use the iPad as Second Display for Mac.
Prerequisites
- Update macOS and iPadOS to Latest Version.
- iPad and Mac should be on the same Apple ID.
- iPad and Mac should be on the same WiFi Connection.
- Enable Bluetooth on both Mac and iPad.
- Enable Link to Mac or iPad Feature.
- Enable Airplay and Handoff on iPad and Mac.
Setup Universal Control to Use iPad as Second Monitor for Mac
Note: If you’re a Windows user and you have an iPad. Then, you can use the iPad as a second monitor for windows.
Step 1: Install Latest macOS and iPadOS Update
If you haven’t updated your MacBook and iPad for a while. Then, you won’t find options to link Mac and iPad Displays. Personally, I have tested the Universal Control feature in macOS Ventura and iPadOS Version 16. So, if you’re using an older version of macOS and iPad OS, then this feature will not work for you.
For iPad Users
- Open Settings App.
- Tap on General > Software Update.
- That’s it, iPad will now check for updates for you.
- And, if there is any pending update found, then you can click on the “Download and Install” option to proceed.
For Mac Users.
- Click on the Apple menu from the upper left corner of the screen.
- Click on System Settings. In the system settings app. Click on General > Software Update.
- Or, Click on System Preferences – In System Preferences, click on Software Update.
- If you find any macOS update, then click on “Upgrade Now” to proceed.
Step 2: Enable the Link to Mac or iPad
- Click on the Apple menu from the upper left corner. After that, click on System Settings.
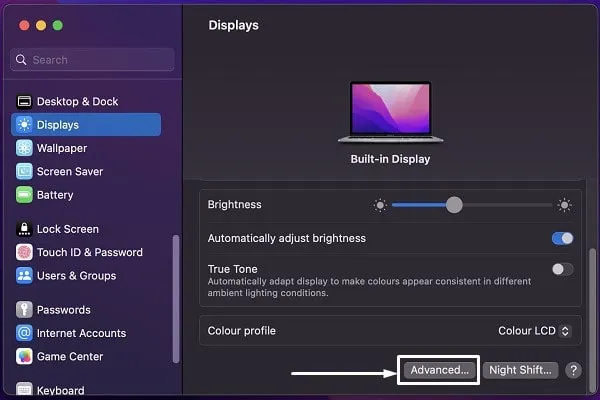
- Once, the system settings app gets opened. From the left pane, click on Displays.
- Displays settings will get open, Click on Advanced.
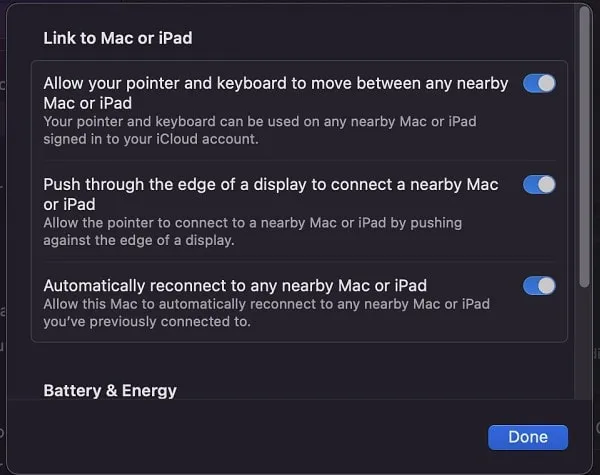
- Now, you will find three options under the “Link to Mac or iPad” section. Enable all three options.
- Allow your pointer and Keyboard to move between any nearby Mac or iPad.
- Push through the edge of the display to connect a nearby Mac or iPad.
- Automatically reconnect to any nearby Mac or iPad.
- That’s it. Now you just have to enable Bluetooth, Airplay, and Handoff.
Step 3: Enable AirPlay and Handoff
To control your iPad through Mac Keyboard and Mouse. Or, to use the iPad as Second Monitor or Extended Display for Mac. You have to enable AirPlay and Handoff on both Apple devices.
Enable AirPlay and Handoff on Mac.
- Click on the Apple menu and after that click on System Settings.
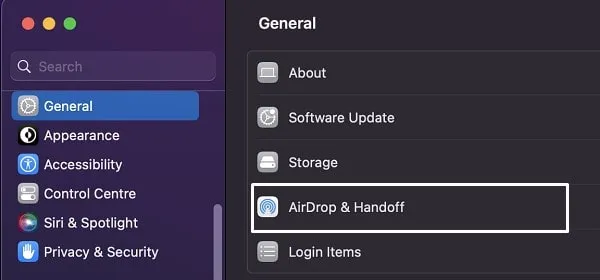
- Once, the system settings app gets opened. Go to General > AirDrop & Handoff.
- Now, enable “Allow handoff between this Mac and your iCloud devices”.
- After that, do enable the “Airplay Receiver” feature.
- Next in Allow Airplay for > do select the “Anyone on the same Network” option.
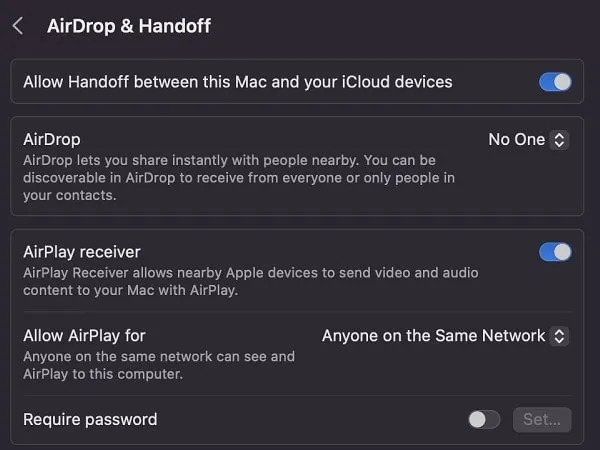
- Enable the “Require Password” option, if your WiFi isn’t secured.
Enable AirPlay and Handoff on iPad
- Open Settings App.
- Tap on General > AirPlay & Handoff.
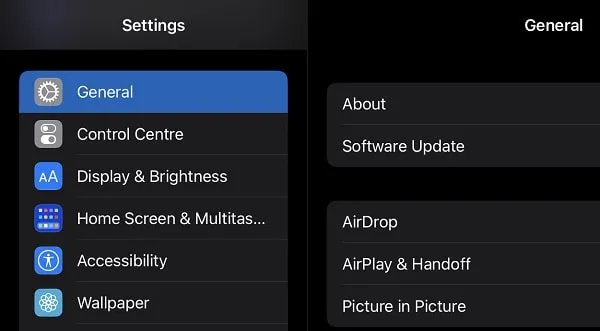
- Now, do enable the following two options.
- Handoff
- Cursor and Keyboard
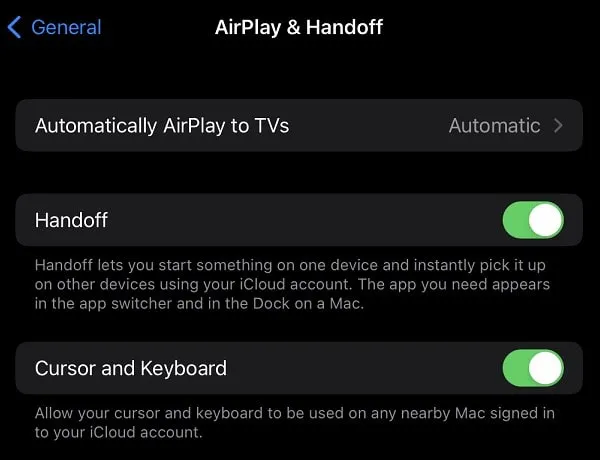
- By enabling these two options, you will able to control your iPad through Mac Keyboard and Touchpad (Mouse).
Step 4: Enable Bluetooth and Connect to the same WiFi
First, do connect your Mac and iPad to the same WiFi network. After that, do enable Bluetooth on both devices. Else, you will not get the option to add a secondary display to your Mac. Also, make sure both devices use the same Apple ID.
Step 5: Use the iPad as a Secondary Monitor for Mac
You’re now ready to connect iPad Display to Mac. Do follow these steps, to Mirror or Extend iPad Display to Mac.
- Open System Settings App by clicking on Apple Menu.
- Once, the System settings app get opened, scroll from the left pane, and click on Displays.
- You will now see a “+” icon next to your Mac Built-In Display. Click on it.
- Once, you click on it, you get two options.
- Link Keyboard and Mouse to iPad
- Mirror and Extend to iPad
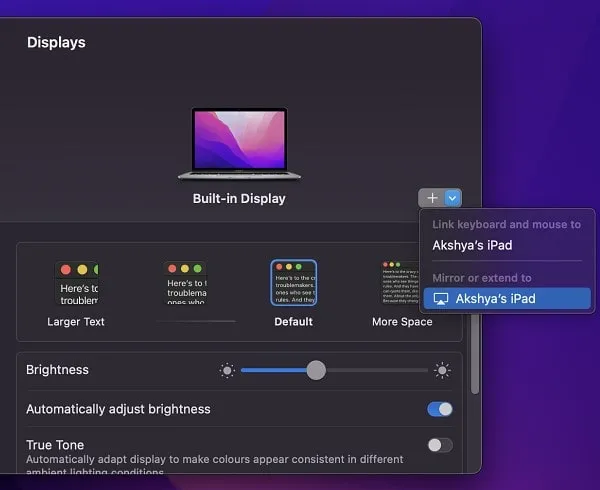
- If you want to control your iPad through your Mac’s Mouse and Keyboard then do select the first option. And, you will able to use your Mac Keyboard and Mouse on iPad.
- But since we want to use iPad as Second Monitor for Mac. That’s why do select the “Mirror and Expand to iPad” option. (Later we will enable the first option as well.)
- That’s it, your Mac Display will get Mirrored to the iPad.
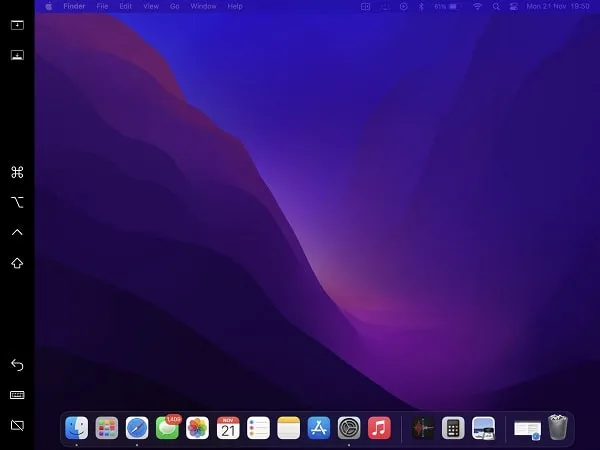
- Now, From display settings, select your iPad Display. And, in Use as a drop-down menu, select the “Extended Display” option. That’s it, you will able to now use the iPad as a secondary display.
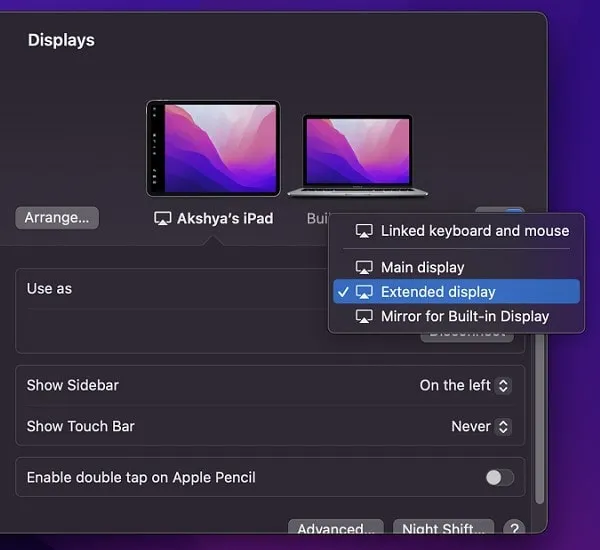
- Yes, you can also mirror the iPad display or use it as your main display.
- To use the full iPad screen, you can select “never” in the “Show TouchBar” Option. Also, you can choose the “Sidebar” position as per your need. In Sidebar you get multiple useful options, so don’t disable it.
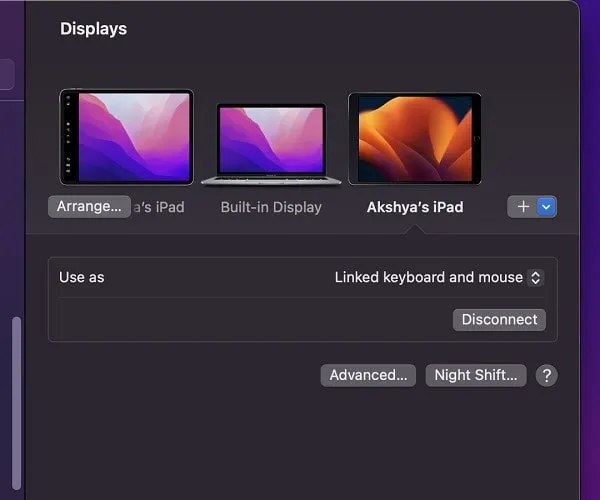
- When you use your mouse pointer on iPad Screen. The “Linked keyboard and mouse” option will get auto-enabled.
- Yes, the iPad gets connected as a second display. You will see an icon in Menu Bar. You can use it to manage your iPad Display. So, no need to open Settings.
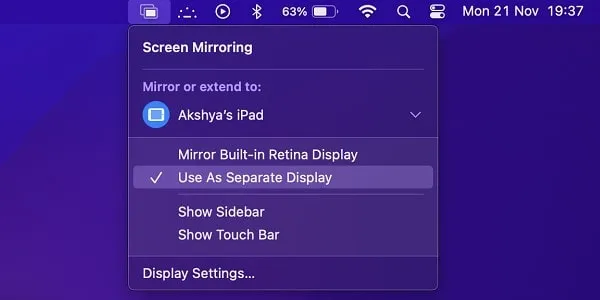
Okay, So that’s how you can Control and Use iPad Screen through your Mac. The setup process is quite easy. You just have to enable a few options once. And, after that, you can easily Mirror or Extend your mac or iPad screen.
