
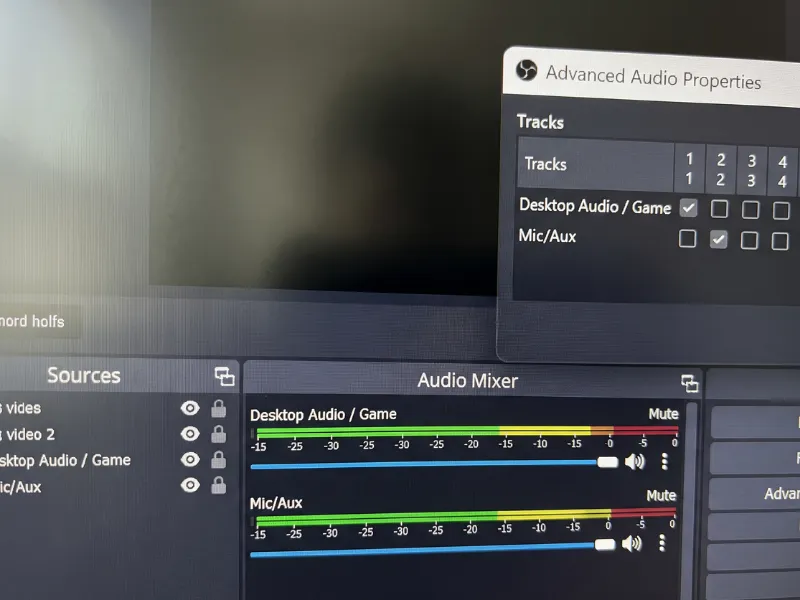
When you record gameplay and commentary in OBS Studio without changing default settings, your game sounds and microphone voice get permanently mashed into a single audio track. This means you cannot lower game volume during loud moments or remove background coughs in post-production without ruining your entire recording.
Separating your audio into distinct tracks lets you edit your voice and game sounds independently. Here is how to configure OBS Studio to record your game audio and microphone on separate tracks, test the file, and avoid common playback traps.
Prerequisites
- OBS Studio (v29.1 or newer recommended)
- A video editor that supports multi-track audio, such as DaVinci Resolve, Adobe Premiere Pro, or CapCut.
Step 1: Configure OBS Output Settings for Multiple Tracks
By default, OBS records all active audio sources into a single track (Track 1). You need to change your output settings to allow multi-track recording.
- Open OBS Studio and click Settings in the bottom-right corner.
- Select the Output tab on the left menu.
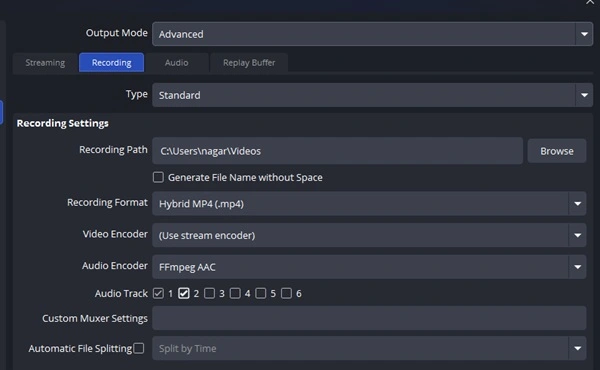
- Change the Output Mode dropdown at the top from *Simple* to Advanced.
- Click on the Recording tab just below the output mode.
- Under the Audio Track section, check the boxes for Track 1 and Track 2. (You can check more tracks if you have additional sources like Discord or music, but Track 1 and Track 2 are enough for game audio and a microphone).
- Click Apply and then OK.
Step 2: Assign Audio Sources in Advanced Audio Properties
Now that OBS is ready to record multiple tracks, you need to tell it which audio device belongs to which track.
- Look at the Audio Mixer panel at the bottom of the main OBS window.
- Click the gear icon next to any audio source to open the menu, then select Advanced Audio Properties.
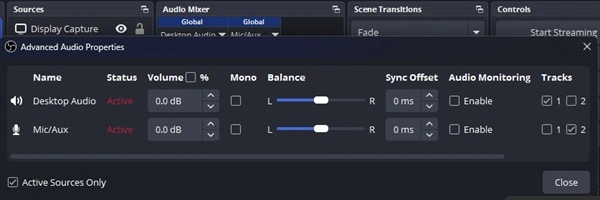
- In the window that appears, you will see a grid of checkboxes corresponding to your audio devices (such as Desktop Audio and Mic/Aux) and tracks (1 through 6).
- Find your Desktop Audio (game sound) row and check the box for Track 1. Uncheck it for all other tracks.
- Find your Mic/Aux (microphone) row and check the box for Track 2. Uncheck it for all other tracks.
- Close the Advanced Audio Properties window.
Step 3: Test and Verify in Your Video Editor
Standard video players like Windows Media Player or VLC usually only play the first audio track, making it sound like nothing changed. To verify your setup, you must test the file in a video editor.
- In OBS, click Start Recording, play a game or speak into your microphone for a few seconds, then click Stop Recording.
- Open your video editing software (such as DaVinci Resolve or Premiere Pro) and import your newly recorded video file.
- Drag the file onto your timeline.
- Check the audio timeline tracks. You should see two distinct audio waveforms stacked on separate tracks—one for your game audio and one for your microphone.
- Mute Track 1 and play the timeline; you should hear only your microphone. Then mute Track 2 and play; you should hear only the game audio.
Troubleshooting & Fallbacks
- Checkboxes are greyed out: If you cannot select multiple tracks, ensure your output mode is set to Advanced and that your recording format (found under Settings > Output > Recording) is set to a container that supports multiple tracks, such as
mkvormp4. - Editor only shows one track: Some free video editors collapse multi-track audio upon import if channel mapping is set to stereo downmix by default. Check your editor’s import preferences or right-click the audio clip in your project bin to change its clip attributes from stereo to dual mono or discrete multi-track channels.